6/29/09

Second Lesson: Make a stamp size photo

Think we have a picture that’s size is not satisfiable. If we want to make a passport / stamp or 4R or 3R photo we have to need a important software named : Adobe Photoshop. Its has lots of version but I mainly use adobe photoshop 7.

Now I want to tell the procedure that how can make a expected photo from a unshape photo.

Make a Stamp size Photo:

In many country they support passport size as : 266 * 325 . If anywhere its may changeable then they can use on that size. Whatever at first we have to open the phoshop software manually. Its look like this :


  • Then we have to open the the photo which we want to make stamp size.
  • Think we want to make a stamp size photo named b.jpg and we have a soft copy of that man, Ok . Now open the photo by photoshop.Its look like this :


  • Now its size is 300 * 378
  • We can see the size by clicking => image => image size
  • Now we have to make it as a size of 266 * 325. So
  • click =>image tag=> image size
Then change the size pixel dimention : width as 240 and height as 302

Press ok
  • Mainly its background color will be white But if we want to change the color then we have to select the setbackground tag from the left side box.
  • But we need white bacground color in this photo if our image background is not white ,and in this example we use a photo whose background color is fade blue. So we need white background and don’t change the background color.
Here we select the setbackground tag by RED rectangular shape.


Now we have to open a new blank photo page size as 266 * 325 . But How ?
Press =>File=> new=> in image size box we have to give the : width as 266 and height as 325

Now select the Rectangular Marquee Tool and In previous image (b.jpg) we have to select the full image by this tool.

Then copy this by pressing Ctrl+C or from click =>Edit=>Copy
Then paste it on the new open blank photo by pressing Ctrl+V or from click =>Edit=>Paste.
Here we can see a white border between photo background and our blank photo shape. This is photo padding which makes the photo beautifull.

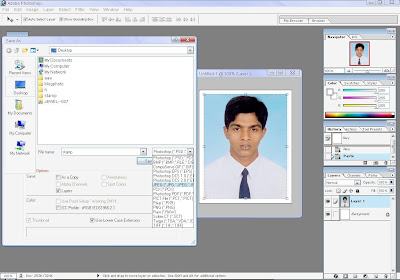
  1. Then save the photo by clicking => File => Save As =>
  1. give a name at file name box and it’s a important that change the photo type from right combo box , we need .jpeg formate to show the image.Otherwise we can’t open the image without photoshop.
  2. Press save=> then ok .no need to change other things.

  • This is our expected stamp size photo

6/19/09

First Lesson : make a Passport Photo

Want to make a home studio:


NB: Any beginner people can make photo by this instruction, but if anyone face any problem please e-mail me at--> rontdu@yahoo.com

Please give the subject: photo making problem.


Think we have a picture that’s size is not certifiable. If we want to make a passport / stamp or 4R or 3R photo we have to need important software named: Adobe Photoshop. Its has lots of version but I mainly use adobe Photoshop 7.


Now I want to tell the procedure that how can make an expected photo from an unshaped photo.


Make a Passport size Photo:

In many countries they support passport size as: 510 * 630. If anywhere its may changeable then they can use on that size. Whatever at first we have to open the Photoshop software manually. Its look like this:


Then we have to open the photo which we want to make passport size.

Think we want to make a passport size photo named b.jpg and we have a soft copy of that man, Ok. Now open the photo by Photoshop. Its look like this:

Now, its size is 300 * 378

We can see the size by clicking => image => image size

Looks like:

Now we have to make it as a size of 510*630. So

  • click =>image tag=> image size

  • Then change the size pixel dimention : width as 480 and height as 605

  • Press ok

  • Mainly its background color will be white But if we want to change the color then we have to select the setbackground tag from the left side box.

  • But we need white bacground color in this photo if our image background is not white ,and in this example we use a photo whose background color is fade blue. So we need white background and don’t change the background color.

Here we select the setbackground tag by RED rectangular shape.


Now we have to open a new blank photo page size as 510*630.But How ?

  • Press =>File=> new=> in image size box we have to give the : width as 510 and height as 630

  • Now select the Rectangular Marquee Tool and In previous image (b.jpg) we have to select the full image by this tool.

  • Then copy this by pressing Ctrl+C or from click =>Edit=>Copy

  • Then paste it on the new open blank photo by pressing Ctrl+V or from click =>Edit=>Paste.

Looks like photo


Here we can see a white border between photo background and our blank photo shape. This is photo padding which makes the photo beautifull.


  • Then save the photo by clicking => File => Save As => give a name at file name box and it’s a important that change the photo type from right combo box , we need .jpeg formate to show the image.Otherwise we can’t open the image without photoshop.

  • Press save=> then ok .no need to change other things.

Your passport size photo is ready.....